
Leo Tools & Features
A tour of every button in the Leo interface — what each one does and when to use it.
Leo is your AI coding agent, and the chat interface gives you a row of tools for steering it — controlling how carefully it works, showing it what you mean, attaching files, switching modes, and saving your progress. This guide walks through each one.
Most of these live in the chat box at the bottom-left of your screen. A few — version history, settings, and tickets — live in the toolbars around the edges. Use the quick links below to jump to any section.
How Leo Edits: Auto vs. Plan vs. Ask
This setting controls how much freedom Leo has to make changes. It lives next to the send button, shows "Auto" by default, and lets you dial Leo's autonomy up or down depending on how careful you want it to be.
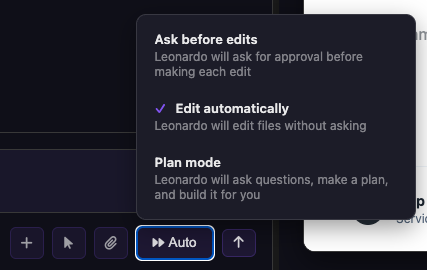
Edit Automatically
Default · Fastest
Leo makes the changes it thinks are best and applies them right away, without stopping to plan or ask. This is the standard way to work and keeps you moving quickly.
Plan Mode
Slower · More thoughtful
Leo asks clarifying questions, researches your codebase more deeply, and writes out a plan before building it for you. It takes a bit longer, but Leo is more careful and less likely to make mistakes. Reach for this on anything complex or risky.
Ask Before Edits
Slowest · Most control
Leo pauses and asks you to confirm every change before applying it. The most hands-on option — significantly slower, but nothing happens without your approval.
Rule of thumb: stay on Edit Automatically for everyday work, switch to Plan Mode when a change is big or you want extra care, and use Ask Before Edits when you want to approve each step yourself.
The Chat Toolbar
Next to the message box you'll always see three buttons — the paperclip (attach), the mouse pointer (element selector), and the plus ("More Tools"). The plus button expands the rest of the toolbar, revealing the mode selector, the model picker, and the screenshot, screen-record, prompt-library, and capture-logs tools. Together they let you give Leo more context and change how it works.
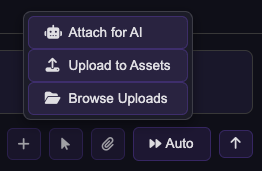
Attach File (paperclip)
The paperclip opens three options for getting files into your project:
- Attach for AI — a file that Leo can see and read. Use this to give Leo reference material, a document, or data to work from in the conversation.
- Upload to Assets — adds a file to your app's backend assets. Use this for images on your site, Excel files, profile pictures, header images, and anything your app itself needs to serve.
- Browse Uploads — view and manage everything you've already uploaded.
Supported file types: PDF, images (PNG, JPG, GIF, WebP), spreadsheets (XLSX, XLS, CSV), and short videos (MP4, WebM). You can also drag-and-drop files straight onto the chat.
Element Selector (mouse pointer)
Click the selector, then click any element in your app — a button, a heading, a table, anything. This points Leo straight at what you're talking about, so you don't have to describe where it is. Great for "make this bigger" or "change this color."
Modes (dropdown inside More Tools)
Once you've opened More Tools (the plus button), a mode dropdown appears. Modes change what Leo focuses on. Everyone starts in Beginner mode; switch when your task calls for it.
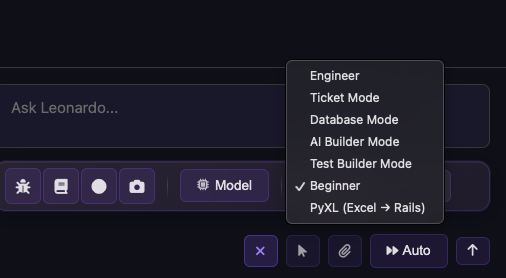
Beginner Mode
The starting mode for everyone. Less technical detail, fewer messages — a clean, approachable way to build.
Engineer Mode
Similar to Beginner, but tuned for when Leo is actively building and making changes throughout your session.
Ticket Mode
Research-only. You describe a task the way you would in Engineer mode, and instead of building, Leo studies your codebase in detail and writes up a ticket — laying out the current behavior, the desired behavior, and any questions it has. View tickets from the Tickets window at the top of the screen. Think of it as planning taken one level further.
Database Mode
For changes to your database only. It avoids touching core working functionality like your app's functions and logic.
It's also a handy safe mode for asking questions: if you want to understand how something works without Leo randomly making changes, ask in Database mode and it'll stick to explaining rather than editing your app.
AI Builder Mode
Helps you add AI features into your own app — for example, adding chat or other AI-powered features for your end users.
Test Builder Mode
Focuses Leo on writing automated tests for your app, so you can catch regressions as you keep building.
PyXL (Excel → Rails)
For turning a spreadsheet into a working app. The best way to get Leo to understand your Excel file and convert it into real, working code.
Typical Ticket workflow: create a ticket in Ticket mode, open it from the Tickets window, then copy its contents into a new chat in Engineer mode to have Leo carry it out.
Model Selector
Choose which AI model powers Leo. The dropdown lists models across providers — for example Gemini, Claude, GPT, and DeepSeek variants — though only the ones enabled for your account are selectable.
Some options appear grayed out — those require you to bring your own API keys. If you'd like to use one of them, let us know and share your API keys and we'll enable it for you.
Heads up: not every model can see images and videos. Some — such as DeepSeek V4 Flash — are text-only and will ignore attached screenshots, photos, or screen recordings. If you're sharing an image or video with Leo, switch to a vision-capable model (for example a Gemini or Claude option) first.
Capture Screenshot
Take a screenshot of anything in your browser and hand it to Leo — a quick way to show a visual bug or exactly what you're looking at.
Record Screen
Record a short screen capture to show Leo a flow or a bug that's easier to demonstrate than to describe.
Prompt Library
Handy if you reuse the same prompts regularly. Create and save your own prompts and skills, then quickly select one while writing a message instead of retyping it each time.
Capture Logs (bug button)
The little bug icon captures your app's logs (both the JavaScript console and the Rails server logs) so Leo can see exactly what went wrong when something breaks. It records over a ~10-second window, then drops the captured logs straight into your message box, ready to send.
How to use it: click the bug icon first, then reproduce the error while it's recording (the button shows it's capturing for about 10 seconds). It grabs the logs from that window — so trigger the bug during the capture, not before. When it finishes, review the logs it added to your message and send them to Leo. Click the icon again to cancel a capture early.
Workspace & Settings
Beyond the chat box, a few toolbars around the edges of the screen manage your conversations, save your work, and adjust your settings.
Conversations (hamburger menu, top-left)
The hamburger menu opens your conversations. The plus button there starts a new chat.
Strong recommendation: start a new chat every time you switch to a different topic. If you just updated your colors and now want to add a new feature, open a fresh conversation. It keeps each chat focused and helps Leo stay sharp.
View History (clock icon)
This is how you save your work to your own GitHub, roll changes back, and return to earlier versions of your app. Saving is two steps:
- 1 Save a checkpoint — click the plus button, describe your changes, and hit Save.
- 2 Push to remote — click the cloud button to push your saved checkpoint up to GitHub.
Connect your GitHub first. Version history needs your GitHub connected. If you see a "Contact Kody at LlamaPress to connect your GitHub" message, reach out and we'll get you set up.
Settings (gear icon)
The settings menu holds a few useful controls:
- User Roles — add and manage user roles for your app.
- Leonardo.md file — view the context file that describes your project. It's the background Leo keeps in mind as it works on your app.
- Token Wheel — turn this on to see how much of the current conversation's context window is in use (it fills toward ~100K tokens). Once enabled, it sits in the bottom-left corner, just above the chat box, so you can keep an eye on it as you work. A good rule of thumb: once it climbs above ~90%, it's a good time to start a fresh chat. Your conversation also auto-summarizes as it grows — so if you see the wheel suddenly jump down from a high number to a lower one, that means Leo has summarized your earlier messages to free up room. Either way, when the wheel is consistently full, Leo is running low on space — especially for things discussed early in the conversation — and that's the moment to start a fresh chat.
- Auto-Refresh on Edit — on by default. Leo refreshes the preview as it makes changes so you see updates live. Turn it off if you'd rather refresh manually and only see your changes when you're ready.
Tickets
A Tickets tab sits in the preview pane's tab bar at the top (alongside Your App, Code, and Feedback) and opens your Kanban board of tickets. This is where the tickets Leo creates in Ticket mode show up. Open one, then copy its contents into a new Engineer-mode chat to have Leo build it.
Before you hand a ticket back to Leo, read through it — it's broken into a few parts, and a quick review now saves rework later:
- Current Behavior — Leo's understanding of how things work today. Read it and confirm it matches reality.
- Desired Behavior — what the change should accomplish. Make sure this is actually what you want before Leo builds it.
- Questions & assumptions — Leo will often have questions or note assumptions it made. Watch for these and answer them, since they can change how the work gets done.
Leo can't edit a ticket in place. If a ticket needs changes, Leo won't update the existing one — it will create a new ticket instead. So don't be surprised to see a fresh ticket appear rather than edits to the old one.
The Tickets and Code tabs are geared toward technical work, so they may be hidden depending on your account's role/mode.
New to Leo? Start with the Getting Started guide, then come back here as a reference whenever you want to know what a button does.